Blogging on Squarespace 7.1 : A Quick Start Guide
If you’re a Squarespace user, then I have some good news! Contrary to what some people may think, blogging on Squarespace is one of the best marketing tools you can use to sustainably grow your business and gain visibility in the online space (in my humble opinion)! The benefits are numerous and include boosting your SEO scores, building trust with your target audience, establishing credibility, positioning yourself as an expert, and providing some serious value to those who read your blog. Blog posts live a long time and are one of the most common ways that people consume content when they have a burning question about anything from running a business to DIY crafts. Plus, blogging on Squarespace is super simple to setup and maintain too. Woooo! Have I sold you on it yet?!
Before we go one step further, can we just address the elephant in the room?! It's common to hear people say that Squarespace isn't the best platform for starting a blog or ranking well on SEO (#Squarespacehatersgonnahate), but I disagree! After consistently blogging on my Squarespace website and showing up on page 1 of Google, I can safely say that Squarespace is not the SEO devil. If you follow along to this quick start guide, you’ll be serving yourself up some seriously sweet Google juice and be well on your way to page 1 city; despite whatever rumours you’ve heard!
But, more goes into creating a blog than just the techie side of things, so we are going to cover planning your blog, actually creating it, and then maintaining it from your first blog post and beyond. We're going to break this down into three simple steps that will tell you how to get set up and blogging on Squarespace 7.1 in no time:
Pick categories and keywords
Set up your blog in four steps
Create your first blog post
Step 1 - Pick your categories and keywords!
Make sure they’re both relevant to your target audience and are all topics you love to write about! Try not to choose too many - around 3-6 is a good starting point. List out keywords that tie into these topics and that you’d like to rank for (aka - show up in Google search results). Use tools like Pinterest, Google and Ubersuggest to research keywords. These are words that you can include in each of your blog posts to increase your SEO points. Aim for one main keyword phrase and use it throughout the post (but not in a spammy way, ofcourse!).
For example, I target female entrepreneurs with Squarespace website design, so I include those as common keywords in my blogs. If your ideal client is a busy stay-at-home mother, then you can include that as a keyword in your blog posts. If you aren't sure who you want to target as your ideal client or how you’re going to attract them, then this blog post will help you out with that!
Here are some other places I would recommend adding your main keywords when blogging on Squarespace:
Main title of the post (using H1)
At least 1-2 headings in the post (using H2 or H3)
Scattered throughout the main body of the text
Image file names for any images you include in the post
SEO description for the post (more on this below)
URL slug (more on this below too!)
I could go on…but that’s a blog post for another day!
Once you have your categories and keywords established, list out some blog post ideas for each category to get you started. I love using Asana to manage my business and have an editorial calendar set up there where I have all of my blog post ideas stored.

I also have a doc saved in my notes app on my phone where I add in content ideas when I’m on the go, as I always get ideas when I’m out doing other things! I find that as soon as I have one or two ideas down, they keep on coming! When you're brainstorming ideas, think about what questions your ideal client may have about your industry. Answerthepublic.com is a great tool to use to find the answer to questions people may be asking about your field of expertise. You can also repurpose other pieces of content that performed well with your audience to make the process easier!
Step 2 - Set up your blog on your Squarespace website!
Now that we've finished planning for your blog post, it's time to dive into the backend of your Squarespace website and build a blog that stands out! Here are 5 simple steps you can follow to build your blog in Squarespace 7.1...
1 | Once you're in the settings of your Squarespace website, go to Pages and then hit the plus sign in the right next to either "Main Navigation" or "Not Linked", depending on what your preference is.

2 | Choose "Blog" and select the layout that fits your website the best (don't worry, you can customize it later as well!)

3 | Click on the gear icon and choose "General". Here you can add in your blog name and customize the main URL for your blog. A long URL isn't great, so try to keep it short and to the point.

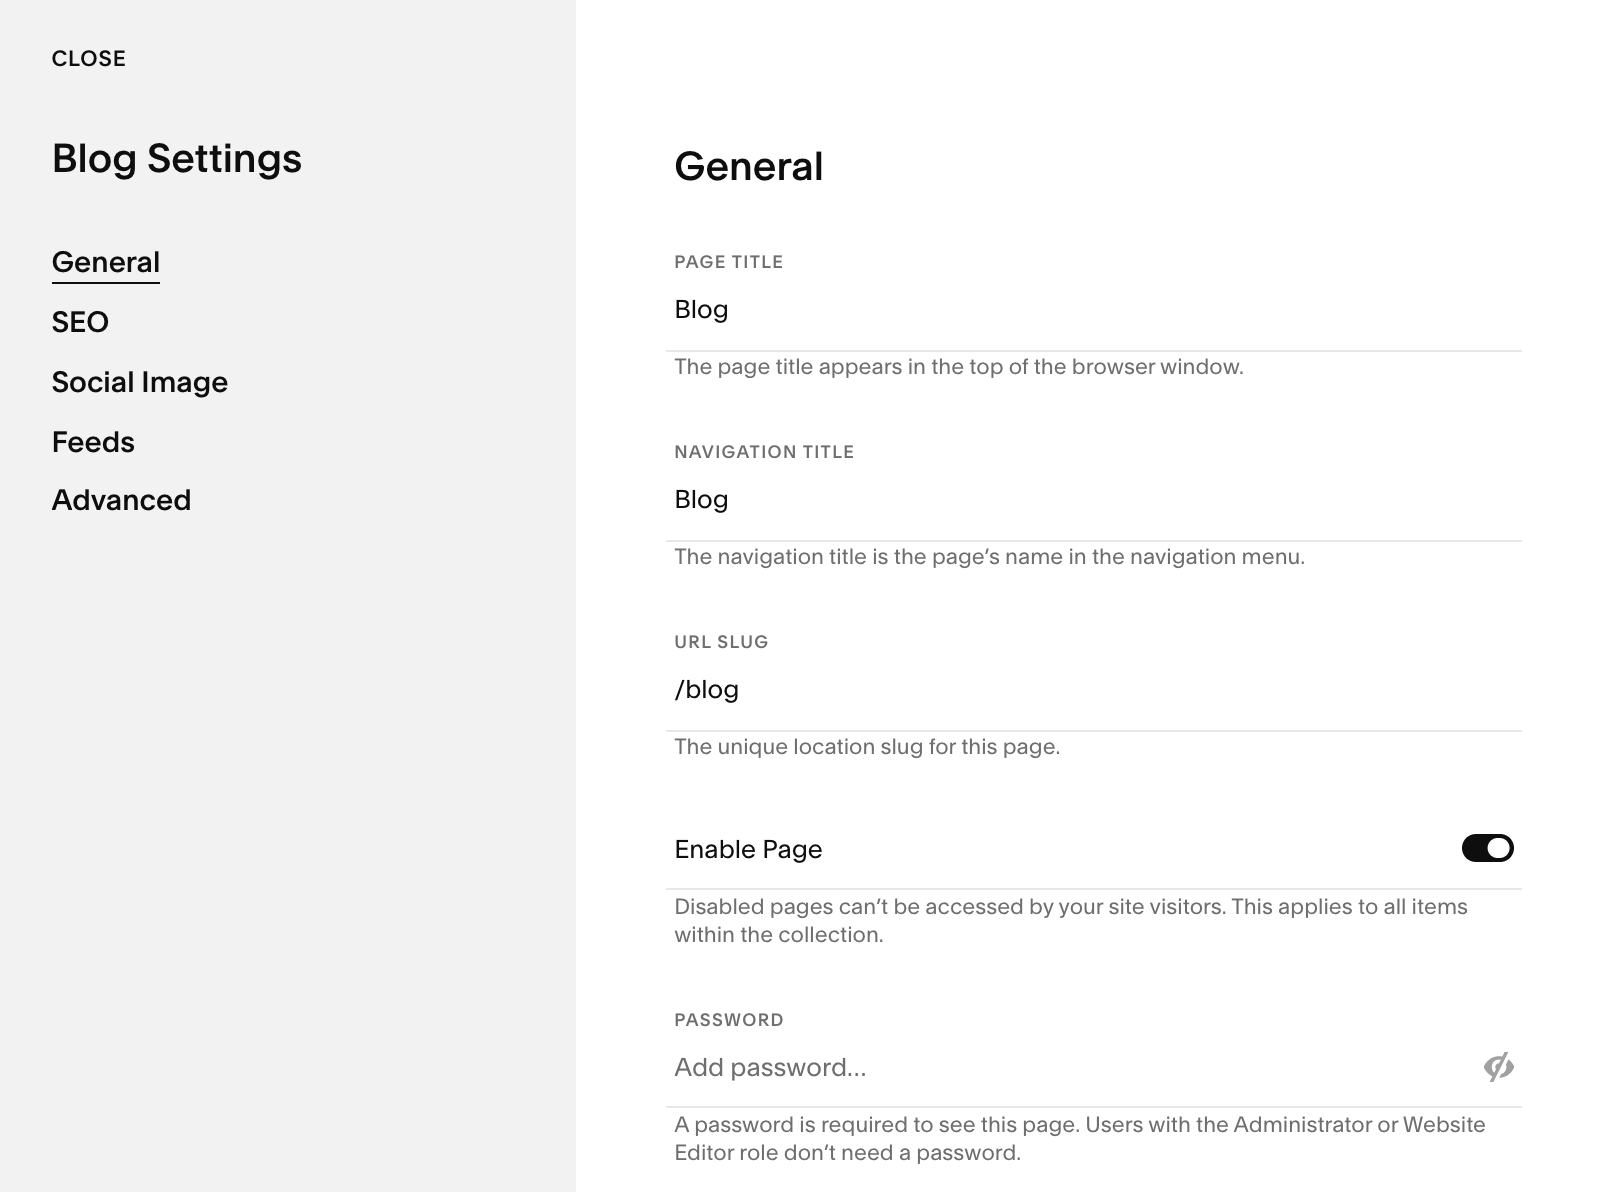
4 | Now on to SEO settings! Add an SEO title that will show up in search engines by including keywords. Add an SEO description below the title, also using chosen keywords so it performs well in Google searches.

5 | Social image - add a logo/social image for your blog here. If you use Pinterest, this is a great place to repurpose one of your Pin graphics!
Bonus tip | Add in your categories and tags under advanced settings!
But now I hear you asking, "Kate! What's the difference between tags and categories?!" And the difference is this - categories are used to group blog posts by subject. For example, my categories include web design tips, business tips, Squarespace tips, branding tips, and my portfolio. On the other hand, tags are more free-flowing and can group blog posts by keywords, years, subject, or anything else that might make your website visitors explore more. But how do you use them? And why are they important? Here are three reasons!
They provide a way of organizing content both on the back and front end of your website
It improves user experience for your blog readers if things are easier to find and navigate
Great for SEO as tags and categories help tell Google what your blog and content is all about
To put it simply, categories are your broader topics that all of your blog content is based around, tags are more specific things you talk about within under each broader topic.
STEP 3 - Create your first blog post!
Squarespace will automatically put filler content into the body of your blog post. So the first step in you’ll need to take is to delete all filler content from the Squarespace template or replace the dummy content with your own.
1 | Next, click on the 3 dots to go into your blog post settings

2 | Under ‘Options’ - Add your categories and tags for that post
3 | Under ‘Options’ - Choose your comment settings

5 | Under ‘Content’ - add your blog post image + check blog post excerpt and URL (make sure it only has the most relevant, descriptive keywords including your main keyword - keep it short, sweet and relevant!)

6 | Under ‘SEO ‘- add SEO description with keywords

7 | Click ‘Edit’ to go into the post and add your content (I suggest pasting it in from the content writing system you use).
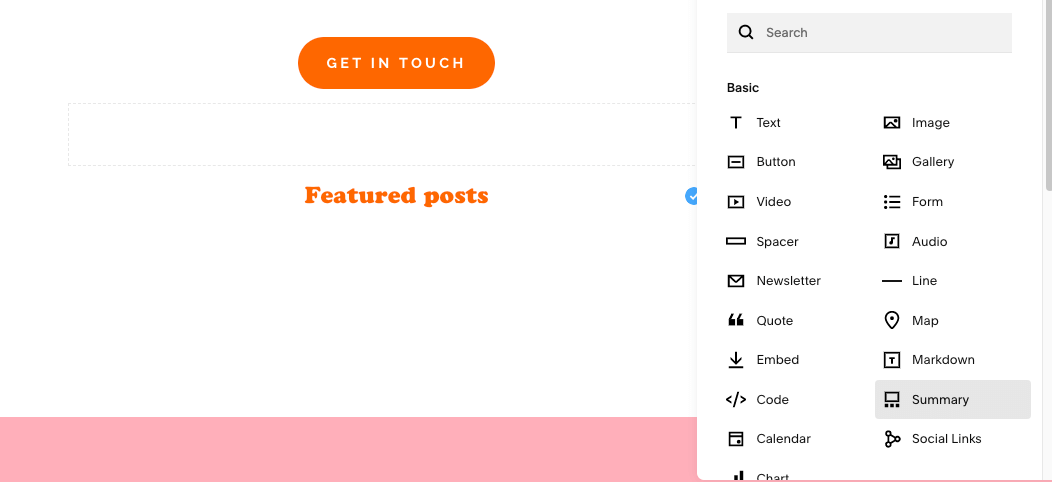
8 | Add any images/videos/lines etc to break up the text
9 | Add content blocks to your blog page just like any other page on your Squarespace website

10 | Lastly, you can choose between saving your blog post as a draft, publishing it then and there, or scheduling it for later. To do this, hover over the save button in the top left corner of the screen and select either publish, schedule, or exit edit mode accordingly!

Now you're ready to post your blog! If you decide to change something later on, don't worry! You can adjust the settings of your blog post by clicking on the pencil icon in the top right of the page.

One thing you may want to adjust is the content width. So instead of your blog posts taking up the full width of your computer screen, it can be a bit more narrow, making it easier to read. I suggest setting it to medium or small!

Once you’re done, hit save and either publish, schedule, or save as draft in the top left!

HANDY TIME-SAVING Tip -
Once you’ve set up your first post, I would recommend using that post as a template for future posts, as all of the styles, settings etc are set up to how you want them to be. If you’re going down this route - be sure to delete all the dummy content and posts from the Squarespace template. When you duplicate your first post to use for future posts, make sure you go into the blog post settings to adjust the URL and name etc
Blogging on Squarespace | Bonus tips for keeping people on your site for longer!
Add internal links to other relevant pages on your site and other blog posts so that people can continue looking around your site during or after reading a blog post. Here’s an example of an internal link in action: internal linking is great for boosting your site’s SEO. If you’re interested in learning more about SEO, then check out this blog post sharing some quick, easy SEO tips you can implement on your Squarespace website today. (See what I did there?!)
You can also add in a ‘featured posts’ summary block at the bottom of your blog posts or a ‘more like this’ summary block with all of your posts from a certain category pulling through. Scroll to the bottom of this post to see one of those in action!
To tag blog posts as featured, pick your top blog posts or your most helpful ones that you want to draw attention to. Then go into: Settings > Options. Next, select the 'featured post'


Then, go to the bottom of your blog post page and insert a summary block. Select your blog, then toggle on featured posts. Et voila!


Blogging on Squarespace | BONUS TIP!!
This bonus bonus tip is an extension of the handy time-saving tip from earlier on in this post (can you tell I’m a people pleaser?!). I’d also recommend setting this featured posts summary block up once on your first blog post. Then, use that post as a template that you can duplicate for all future posts. That way, your featured posts summary block is all set up and ready to go for every post!
These bonus tips will encourage visitors to stay on your website for longer, which will tell Google that people are loving your site and that your content is super valuable. Woooo!
Now you're probably thinking this sounds like a lot of work, but not to worry! My Squarespace templates have blogs all set up for you to use! Each template comes with video tutorials showing how to add your content to your blog and manage it effectively, so you can get setup and blogging on Squarespace in no time! Click the button below to hop on over the Etsy shop and go check ‘em out!

Did you like this post? Then pin it to Pinterest! 👇